
Diffusers documentation
bitsandbytes
bitsandbytes
bitsandbytesは、モデルを8ビットおよび4ビットに量子化する最も簡単な方法です。8ビット量子化では、fp16のアウトライア値とint8の非アウトライア値を掛け合わせ、非アウトライア値をfp16に戻してから加算し、結果としてfp16の重みを返します。これにより、アウトライア値がモデルの性能に与える劣化効果を軽減できます。
4-bit量子化はモデルをさらに圧縮し、量子化されたLLMのファインチューニングにQLoRAと併せて使用されることが一般的です。
このガイドでは、量子化によって、FLUX.1-devを16GB未満のVRAMで、さらには無料のGoogle Colabインスタンス上で実行する方法を示します。
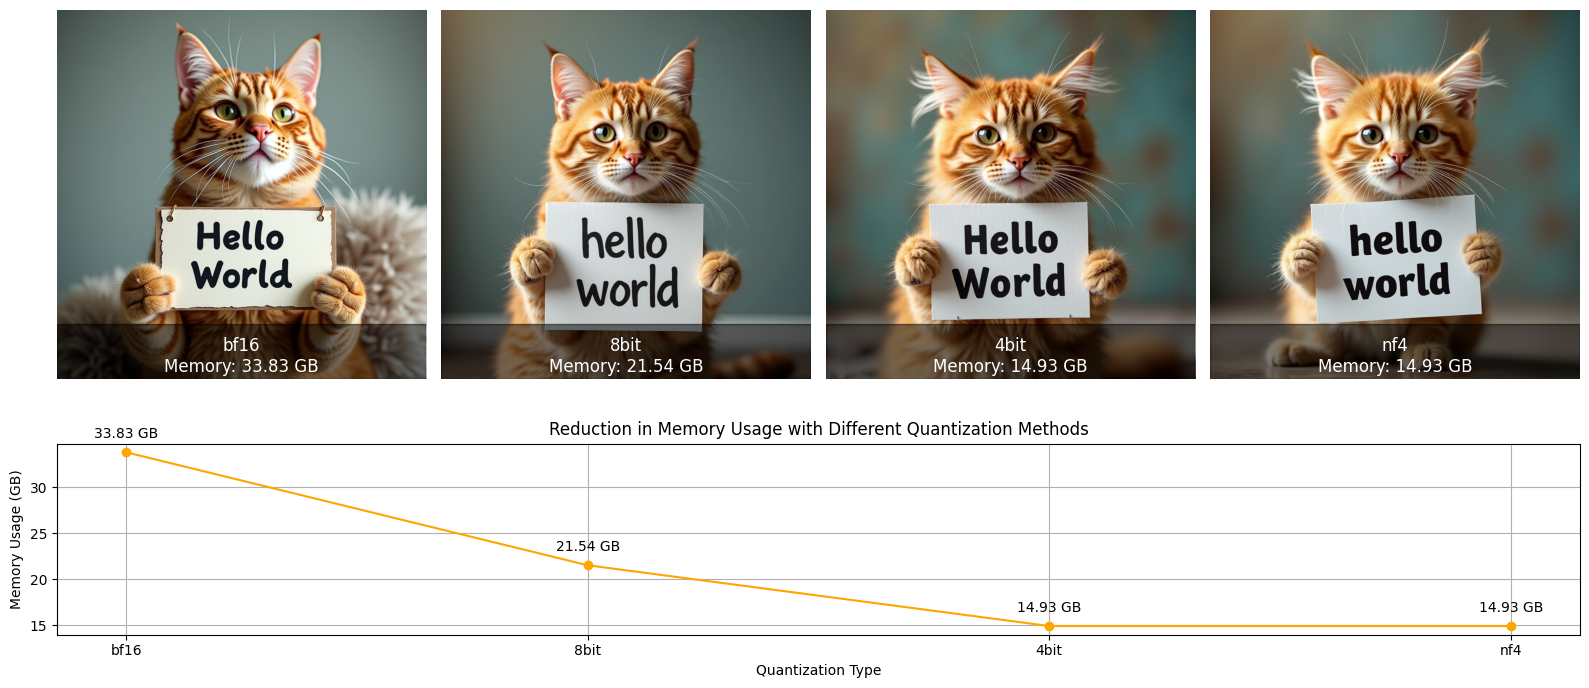
bitsandbytes を使用するには、次のライブラリがインストールされていることを確認してください。
pip install diffusers transformers accelerate bitsandbytes -U
BitsAndBytesConfig を from_pretrained() に渡すことで、モデルを量子化できます。これは、Accelerate による読み込みをサポートし、torch.nn.Linear レイヤーを含むモデルであれば、モダリティを問わず適用できます。
モデルを8ビットに量子化すると、メモリ使用量が半分になります:
bitsandbytes は Transformers と Diffusers の両方でサポートされているため、FluxTransformer2DModel と T5EncoderModel の両方を量子化できます。
Adaシリーズ以降のGPUでは、dtypeをtorch.bfloat16に変更することをお勧めします。
CLIPTextModelと AutoencoderKL は、サイズがすでに小さいこと、および AutoencoderKL にtorch.nn.Linearレイヤーが数層しかないことから、量子化されていません。
from diffusers import BitsAndBytesConfig as DiffusersBitsAndBytesConfig
from transformers import BitsAndBytesConfig as TransformersBitsAndBytesConfig
import torch
from diffusers import AutoModel
from transformers import T5EncoderModel

quant_config = TransformersBitsAndBytesConfig(load_in_8bit=True,)

text_encoder_2_8bit = T5EncoderModel.from_pretrained(
    "black-forest-labs/FLUX.1-dev",
    subfolder="text_encoder_2",
    quantization_config=quant_config,
    dtype=torch.float16,
)

quant_config = DiffusersBitsAndBytesConfig(load_in_8bit=True,)

transformer_8bit = AutoModel.from_pretrained(
    "black-forest-labs/FLUX.1-dev",
    subfolder="transformer",
    quantization_config=quant_config,
    dtype=torch.float16,
)デフォルトでは、torch.nn.LayerNorm などの他のすべてのモジュールは torch.float16 に変換されます。これらのモジュールのデータ型は、dtype パラメータで変更できます。
transformer_8bit = AutoModel.from_pretrained(
    "black-forest-labs/FLUX.1-dev",
    subfolder="transformer",
    quantization_config=quant_config,
+   dtype=torch.float32,
)
量子化モデルを使用して画像を生成してみましょう。
device_map="auto" を設定すると、まず GPU の利用可能な空き領域すべてに、次に CPU に、それでもメモリが不足する場合はハードドライブ(最も遅い選択肢)に自動的に配置されます。
from diffusers import FluxPipeline

pipe = FluxPipeline.from_pretrained(
    "black-forest-labs/FLUX.1-dev",
    transformer=transformer_8bit,
    text_encoder_2=text_encoder_2_8bit,
    dtype=torch.float16,
    device_map="auto",
)

pipe_kwargs = {
    "prompt": "A cat holding a sign that says hello world",
    "height": 1024,
    "width": 1024,
    "guidance_scale": 3.5,
    "num_inference_steps": 50,
    "max_sequence_length": 512,
}

image = pipe(**pipe_kwargs, generator=torch.manual_seed(0),).images[0]
メモリに十分な空きがある場合、.to("cuda") を直接使用してパイプラインを GPU に移動し、enable_model_cpu_offload() を適用して GPU メモリの使用量を最適化することもできます。
Once a model is quantized, you can push the model to the Hub with the push_to_hub() method. The quantization config.json file is pushed first, followed by the quantized model weights. You can also save the serialized 8-bit models locally with save_pretrained().
モデルを4ビットに量子化すると、メモリ使用量が4分の1になります:
bitsandbytes は Transformers と Diffusers の両方でサポートされているため、FluxTransformer2DModel と T5EncoderModel の両方を量子化できます。
Adaシリーズ以降のGPUでは、dtypeをtorch.bfloat16に変更することをお勧めします。
CLIPTextModelと AutoencoderKL は、サイズがすでに小さいこと、および AutoencoderKL にtorch.nn.Linearレイヤーが数層しかないことから、量子化されていません。
from diffusers import BitsAndBytesConfig as DiffusersBitsAndBytesConfig
from transformers import BitsAndBytesConfig as TransformersBitsAndBytesConfig
import torch
from diffusers import AutoModel
from transformers import T5EncoderModel

quant_config = TransformersBitsAndBytesConfig(load_in_4bit=True,)

text_encoder_2_4bit = T5EncoderModel.from_pretrained(
    "black-forest-labs/FLUX.1-dev",
    subfolder="text_encoder_2",
    quantization_config=quant_config,
    dtype=torch.float16,
)

quant_config = DiffusersBitsAndBytesConfig(load_in_4bit=True,)

transformer_4bit = AutoModel.from_pretrained(
    "black-forest-labs/FLUX.1-dev",
    subfolder="transformer",
    quantization_config=quant_config,
    dtype=torch.float16,
)デフォルトでは、torch.nn.LayerNorm などの他のすべてのモジュールは torch.float16 に変換されます。これらのモジュールのデータ型は、dtype パラメータで変更できます。
transformer_4bit = AutoModel.from_pretrained(
    "black-forest-labs/FLUX.1-dev",
    subfolder="transformer",
    quantization_config=quant_config,
+   dtype=torch.float32,
)
量子化モデルを使用して画像を生成してみましょう。
device_map="auto" を設定すると、まず GPU の利用可能な空き領域すべてに、次に CPU に、それでもメモリが不足する場合はハードドライブ(最も遅い選択肢)に自動的に配置されます。
from diffusers import FluxPipeline

pipe = FluxPipeline.from_pretrained(
    "black-forest-labs/FLUX.1-dev",
    transformer=transformer_4bit,
    text_encoder_2=text_encoder_2_4bit,
    dtype=torch.float16,
    device_map="auto",
)

pipe_kwargs = {
    "prompt": "A cat holding a sign that says hello world",
    "height": 1024,
    "width": 1024,
    "guidance_scale": 3.5,
    "num_inference_steps": 50,
    "max_sequence_length": 512,
}

image = pipe(**pipe_kwargs, generator=torch.manual_seed(0),).images[0]
メモリに十分な空きがある場合、.to("cuda") を直接使用してパイプラインを GPU に移動し、enable_model_cpu_offload() を適用して GPU メモリの使用量を最適化することもできます。
Once a model is quantized, you can push the model to the Hub with the push_to_hub() method. The quantization config.json file is pushed first, followed by the quantized model weights. You can also save the serialized 4-bit models locally with save_pretrained().
8ビットおよび4ビットの重みでの学習は、追加パラメータの学習のみサポートされています。
get_memory_footprint メソッドでメモリフットプリントを確認します:
print(model.get_memory_footprint())これはモデルのパラメータのメモリフットプリントのみを示しており、推論時のメモリ要件は推定していません。
量子化モデルは、quantization_config パラメータを指定することなく、from_pretrained() メソッドから読み込むことができます:
from diffusers import AutoModel, BitsAndBytesConfig

quantization_config = BitsAndBytesConfig(load_in_4bit=True)

model_4bit = AutoModel.from_pretrained(
    "hf-internal-testing/flux.1-dev-nf4-pkg", subfolder="transformer"
)
8-bit(LLM.int8() アルゴリズム)
8-bit量子化の詳細については、このブログ記事をご覧ください。
このセクションでは、8ビットモデルの特定の機能、例えばアウトライヤーの閾値やモジュール変換のスキップについて説明します。
外れ値の閾値
「アウトライア」とは、特定の閾値を超える隠れ状態の値を指し、これらの値は fp16 で計算されます。通常、これらの値は正規分布([-3.5, 3.5])に従いますが、大規模モデルでは分布が大幅に異なる場合があります([-60, 6] や [6, 60] など)。8-bit 量子化は値が約 5 程度の場合に良好に機能しますが、それを超えるとパフォーマンスに大きなペナルティが発生します。適切なデフォルトの閾値は 6 ですが、より不安定なモデル(小規模モデルやファインチューニング中)では、より低い閾値が必要になる場合があります。
モデルに最適な閾値を見つけるには、BitsAndBytesConfigのllm_int8_thresholdパラメータで実験することをお勧めします。
from diffusers import AutoModel, BitsAndBytesConfig

quantization_config = BitsAndBytesConfig(
    load_in_8bit=True, llm_int8_threshold=10,
)

model_8bit = AutoModel.from_pretrained(
    "black-forest-labs/FLUX.1-dev",
    subfolder="transformer",
    quantization_config=quantization_config,
)
モジュール変換をスキップ
一部のモデルでは、すべてのモジュールを8ビットに量子化すると不安定になる可能性があるため、量子化を省略できます。例えば、Stable Diffusion 3のような拡散モデルでは、BitsAndBytesConfigのllm_int8_skip_modulesパラメータを使用してproj_outモジュールをスキップできます。
from diffusers import SD3Transformer2DModel, BitsAndBytesConfig

quantization_config = BitsAndBytesConfig(
    load_in_8bit=True, llm_int8_skip_modules=["proj_out"],
)

model_8bit = SD3Transformer2DModel.from_pretrained(
    "stabilityai/stable-diffusion-3-medium-diffusers",
    subfolder="transformer",
    quantization_config=quantization_config,
)
4-bit(QLoRAアルゴリズム)
詳細については、このブログ記事をご覧ください。
このセクションでは、4ビットモデルの特定の機能、例えば計算データ型の変更、Normal Float 4 (NF4) データ型の使用、およびネスト量子化の使用について説明します。
計算データ型
計算を高速化するために、BitsAndBytesConfigのbnb_4bit_compute_dtypeパラメータを使用して、データ型をfloat32(デフォルト値)からbf16に変更できます。
import torch
from diffusers import BitsAndBytesConfig

quantization_config = BitsAndBytesConfig(load_in_4bit=True, bnb_4bit_compute_dtype=torch.bfloat16)
通常の Float 4 (NF4)
NF4 は QLoRA 論文で提案された 4 ビットデータ型で、正規分布から初期化された重みに適応されています。4 ビットのベースモデルの学習には NF4 を使用してください。BitsAndBytesConfig の bnb_4bit_quant_type パラメータで設定できます。
from diffusers import BitsAndBytesConfig as DiffusersBitsAndBytesConfig
from transformers import BitsAndBytesConfig as TransformersBitsAndBytesConfig

from diffusers import AutoModel
from transformers import T5EncoderModel

quant_config = TransformersBitsAndBytesConfig(
    load_in_4bit=True,
    bnb_4bit_quant_type="nf4",
)

text_encoder_2_4bit = T5EncoderModel.from_pretrained(
    "black-forest-labs/FLUX.1-dev",
    subfolder="text_encoder_2",
    quantization_config=quant_config,
    dtype=torch.float16,
)

quant_config = DiffusersBitsAndBytesConfig(
    load_in_4bit=True,
    bnb_4bit_quant_type="nf4",
)

transformer_4bit = AutoModel.from_pretrained(
    "black-forest-labs/FLUX.1-dev",
    subfolder="transformer",
    quantization_config=quant_config,
    dtype=torch.float16,
)推論において、bnb_4bit_quant_typeはパフォーマンスに大きな影響を与えません。ただし、モデルの重みと整合性を保つため、bnb_4bit_compute_dtypeとdtypeの値を使用する必要があります。
ネストされた量子化
ネスト量子化は、追加の性能コストなしにメモリをさらに節約できる技術です。この機能は、すでに量子化された重みに対して2回目の量子化を実行し、パラメータあたり0.4ビットのメモリをさらに節約します。
from diffusers import BitsAndBytesConfig as DiffusersBitsAndBytesConfig
from transformers import BitsAndBytesConfig as TransformersBitsAndBytesConfig

from diffusers import AutoModel
from transformers import T5EncoderModel

quant_config = TransformersBitsAndBytesConfig(
    load_in_4bit=True,
    bnb_4bit_use_double_quant=True,
)

text_encoder_2_4bit = T5EncoderModel.from_pretrained(
    "black-forest-labs/FLUX.1-dev",
    subfolder="text_encoder_2",
    quantization_config=quant_config,
    dtype=torch.float16,
)

quant_config = DiffusersBitsAndBytesConfig(
    load_in_4bit=True,
    bnb_4bit_use_double_quant=True,
)

transformer_4bit = AutoModel.from_pretrained(
    "black-forest-labs/FLUX.1-dev",
    subfolder="transformer",
    quantization_config=quant_config,
    dtype=torch.float16,
)
bitsandbytesモデルのデクアンタイズ
モデルが量子化された後、元の精度にデクォンタイズ(量子化解除)することは可能ですが、これにより品質がわずかに低下する場合があります。デクォンタイズされたモデルを収容するのに十分な GPU RAM があることを確認してください。
from diffusers import BitsAndBytesConfig as DiffusersBitsAndBytesConfig
from transformers import BitsAndBytesConfig as TransformersBitsAndBytesConfig

from diffusers import AutoModel
from transformers import T5EncoderModel

quant_config = TransformersBitsAndBytesConfig(
    load_in_4bit=True,
    bnb_4bit_use_double_quant=True,
)

text_encoder_2_4bit = T5EncoderModel.from_pretrained(
    "black-forest-labs/FLUX.1-dev",
    subfolder="text_encoder_2",
    quantization_config=quant_config,
    dtype=torch.float16,
)

quant_config = DiffusersBitsAndBytesConfig(
    load_in_4bit=True,
    bnb_4bit_use_double_quant=True,
)

transformer_4bit = AutoModel.from_pretrained(
    "black-forest-labs/FLUX.1-dev",
    subfolder="transformer",
    quantization_config=quant_config,
    dtype=torch.float16,
)

text_encoder_2_4bit.dequantize()
transformer_4bit.dequantize()
torch.compile
torch.compile を使用して推論を高速化します。最新の bitsandbytes がインストールされていることを確認してください。また、PyTorch nightly のインストールも推奨します。
torch._dynamo.config.capture_dynamic_output_shape_ops = True

quant_config = DiffusersBitsAndBytesConfig(load_in_8bit=True)
transformer_4bit = AutoModel.from_pretrained(
    "black-forest-labs/FLUX.1-dev",
    subfolder="transformer",
    quantization_config=quant_config,
    dtype=torch.float16,
)
transformer_4bit.compile(fullgraph=True)quant_config = DiffusersBitsAndBytesConfig(load_in_4bit=True)
transformer_4bit = AutoModel.from_pretrained(
"black-forest-labs/FLUX.1-dev",
subfolder="transformer",
quantization_config=quant_config,
dtype=torch.float16,
)
transformer_4bit.compile(fullgraph=True)RTX 4090でコンパイルを有効にした場合、4-bit Fluxの生成は25.809秒で完了し、無効の場合は32.570秒でした。
詳細については、ベンチマーキングスクリプトをご覧ください。